
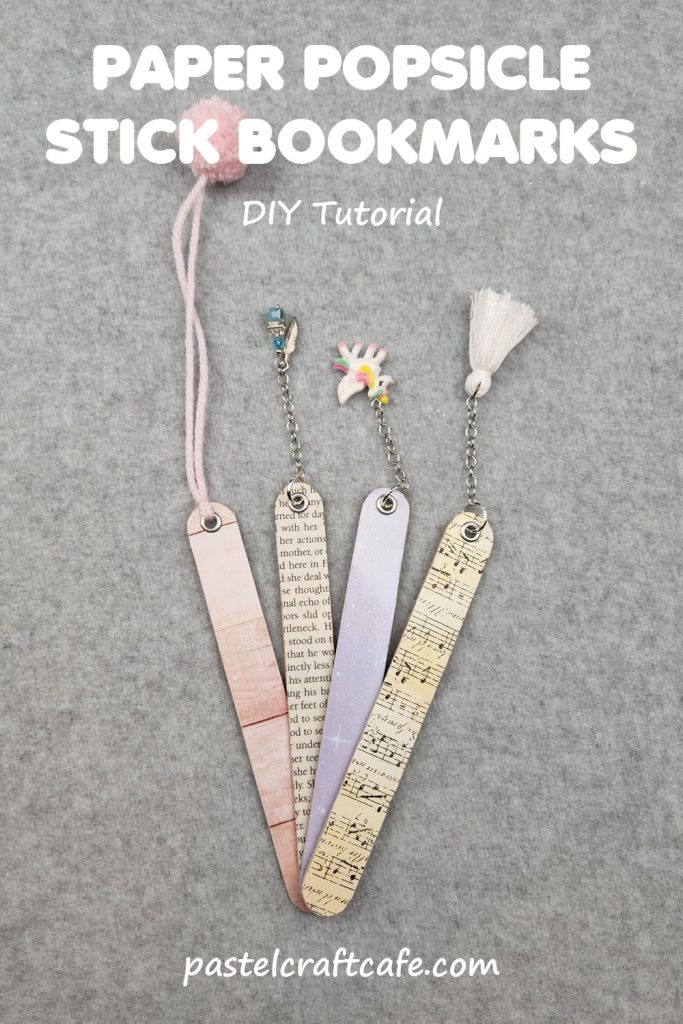
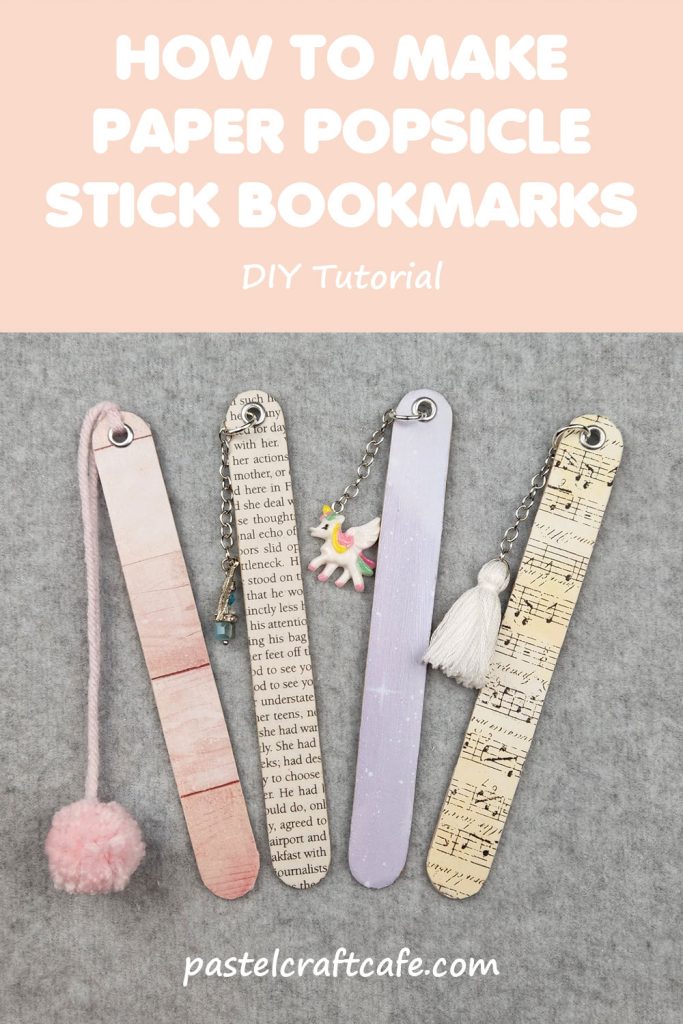
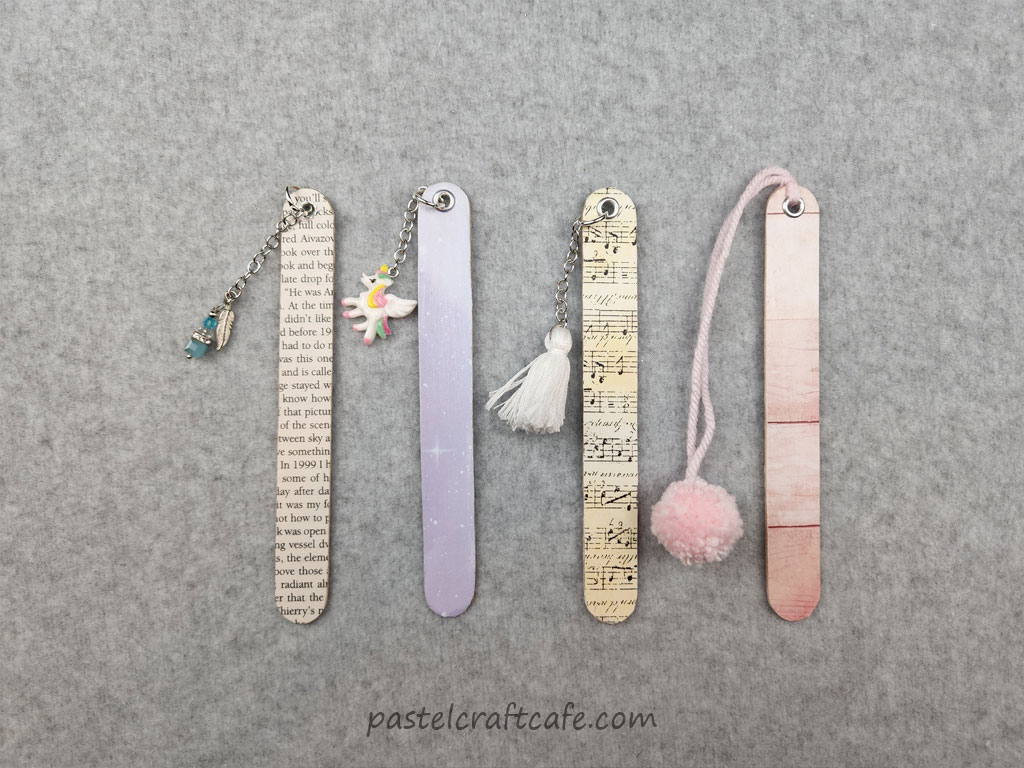
Need something to hold your place in your latest book? Use some old paper scraps to make this adorable paper popsicle stick bookmark. Choose different paper and embellishment combinations to customize your bookmark any way you like!
I don’t quite know why, but I just love making bookmarks. Any kind of bookmarks. It doesn’t matter if they’re made of paper, cording, paper clips, etc. If I can turn it into a bookmark, I will. So this time I wanted to try making a few with popsicle sticks.
There are so many ways that you can decorate them, but for this project I decided to go with paper. I have been itching to make some crafts using old book pages and this seemed like a good a place as any to start.
And I have to say, they are simply adorable! I also used some leftover scrapbook paper to make a few more. So I ended up with four in total.

It took me a bit of trial and error to find the best methods to put everything together (especially when it came to punching the hole at the top). But in the end I’m really satisfied with how everything turned out. These are another one of those projects that can get pretty addicting with how many different ways you can customize them.
I think in the future I’d like to make more bookmarks using popsicle sticks. So if you like this project hopefully I’ll have more in the future as well!

What You Will Need to Make a Paper Popsicle Stick Bookmark
Note: This post may contain affiliate links, which means that if you click on a link and make a purchase, I may earn a small commission at no extra cost to you. For more information, please see my Disclosure.
Supplies
Book Pages (or scrapbook paper)

Truth be told, the Crop a Dile also has an eyelet setter. So the separate Eyelet Setter and Hammer aren’t 100% essential. There are some reasons why you might prefer one or the other though. I’ll talk a little more about that in the tutorial.
Additionally, you will also need an adhesive to glue the paper down. I went with Mod Podge because you can use it as a sealer as well.
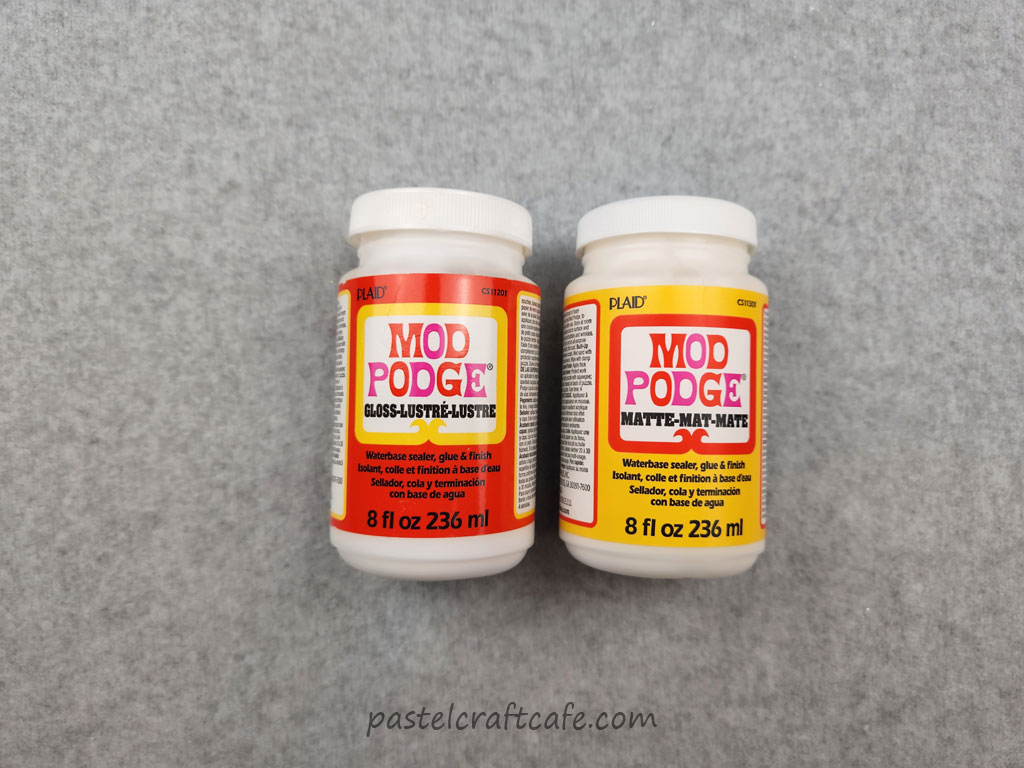
As far as whether to use the matte or gloss versions, that’s going to come down to your project and personal preference. For some of my bookmarks (notably the ones made from book pages) I like the matte look much better. But when using other papers I like the shiny finish of the gloss.
Embellishments
Lastly, you need something to decorate your bookmark with. The sky’s the limit on what you can add onto these things. But here is what I used:

For a couple of them I used jump rings and chain. Then I added little charms to the ends of the chains.
For the other bookmarks I made the embellishments myself. On one I attached a DIY Mini Tassel on the end of a chain.
For the other, I used a DIY Pom Pom. It was an old one I had in my stash, but from the size of it I’m pretty sure I used the Fork Method to make it.
To open and close the jump rings and chain to attach the embellishments, you will need some sort of pliers. I used my favorite pair of chain nose pliers for this.
The embellishments are another way to add a lot of customization to this project. However, if that’s not your style you can also buy premade bookmark tassels too.
How to Make a Paper Popsicle Stick Bookmark
Step 1: Select Paper
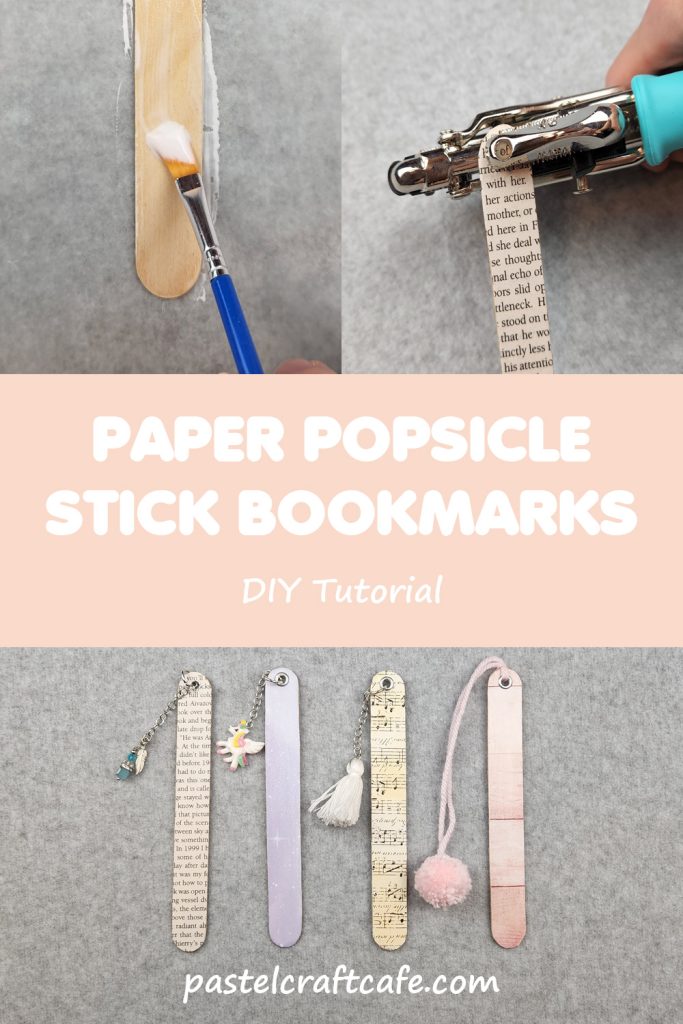
First thing’s first: decide what paper you want to cover your bookmark with. For the main tutorial I’m going to use some pages of an old book.

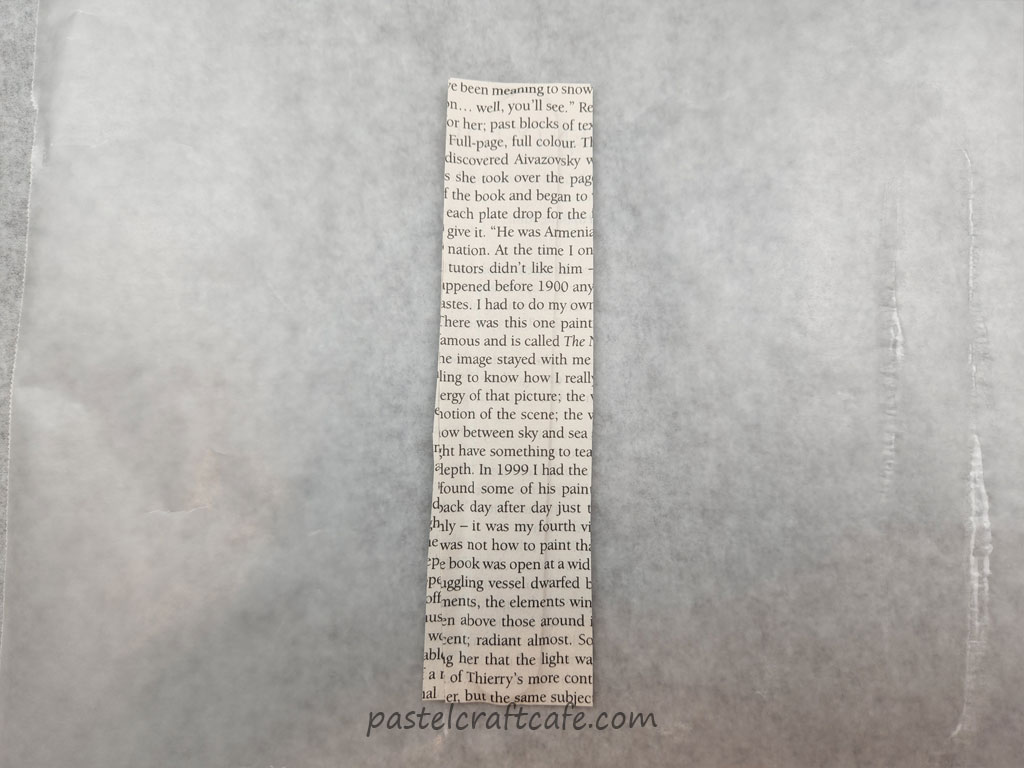
There are a few things to look for when picking your book pages. Most importantly, the full length of the words should be larger than the popsicle stick. But that’s probably pretty obvious.
What might not be so obvious is to look for a page that has very little blank space. Even the jumbo popsicle sticks can’t fit very many words width-wise. So the best pages will be ones that are a big block of text like what’s pictured above.
For the remainder of my popsicle sticks I used a few different pieces of scrapbook paper. Most of them were scraps left over from previous projects.

The sheet music was left over from my Jingle Bell Shadow Box. And the dreamy clouds were what I had left after my 3D Paper Ball Earrings.
The last sheet was one I had stashed away for awhile. Honestly I don’t remember what I originally bought it for. But I thought it would work well for this project.
When buying scrapbook paper, there are also several different kinds. The standard 65lb cardstock would be too thick for this. Instead, go for the thinnest scrapbook papers. I’m not sure of the exact weight, but they feel just slightly thicker than printer paper.
From my experience, most scrapbook paper with a design will be the thinner papers. And the solid colors are typically the 65lb ones. There are exceptions, of course, but that’s usually what to expect.
Step 2: Cut Paper
Next, cut your paper down to size. It doesn’t matter how big the pieces are, just as long as they are bigger than the popsicle stick. I usually leave myself around 1/4-1/2in on each side. This is to ensure that I have enough wiggle room.
You will need two pieces of paper. One for the front side of the popsicle stick, and one for the back.

If you are using book pages like I am, you’ll need to be a bit more careful with how you cut your pieces. Try to keep things lined up so the words on the page don’t end up crooked. This can also apply to certain patterned paper as well.
Step 3: Glue Paper to Popsicle Stick
Now it’s time to glue everything down. Grab your chosen Mod Podge and paintbrush. Then brush a very thin layer onto the popsicle stick.
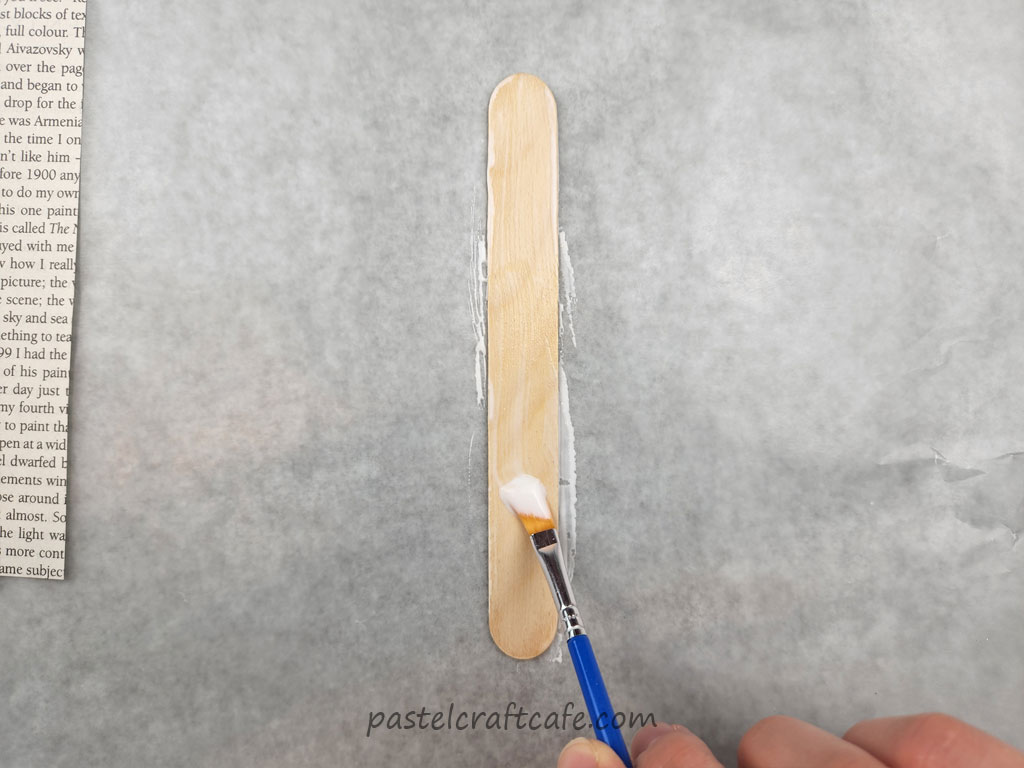
Apply the first piece of paper onto the popsicle stick and press it down. Then flip the stick over and repeat to glue the second piece of paper to the other side. You can glue one side, then the other without waiting for the first side to dry in between.
At this point I like to go back and make sure the paper is properly applied. I press down all over both sides of the stick and make sure there are no air bubbles anywhere. I will also run my fingers along the edges of the stick to really be sure that the paper is glued down all the way to the edges.
At this point, set the stick aside so the glue can dry completely. This usually takes around 20-30 minutes.
Step 4: Trim and File Paper
Once the glue has finished drying it’s time to trim everything up. Grab your scissors and begin cutting the paper as close to the stick edge as possible.

Most likely you won’t be able to cut the paper perfectly. And that’s completely okay. Just do the best you can and the rest will be fixed in a bit.
You also don’t need to worry about cutting things too close either. As long as your glue reached all the way to the edges of the stick and you let the glue dry completely the paper should be secure and won’t peel off while cutting.
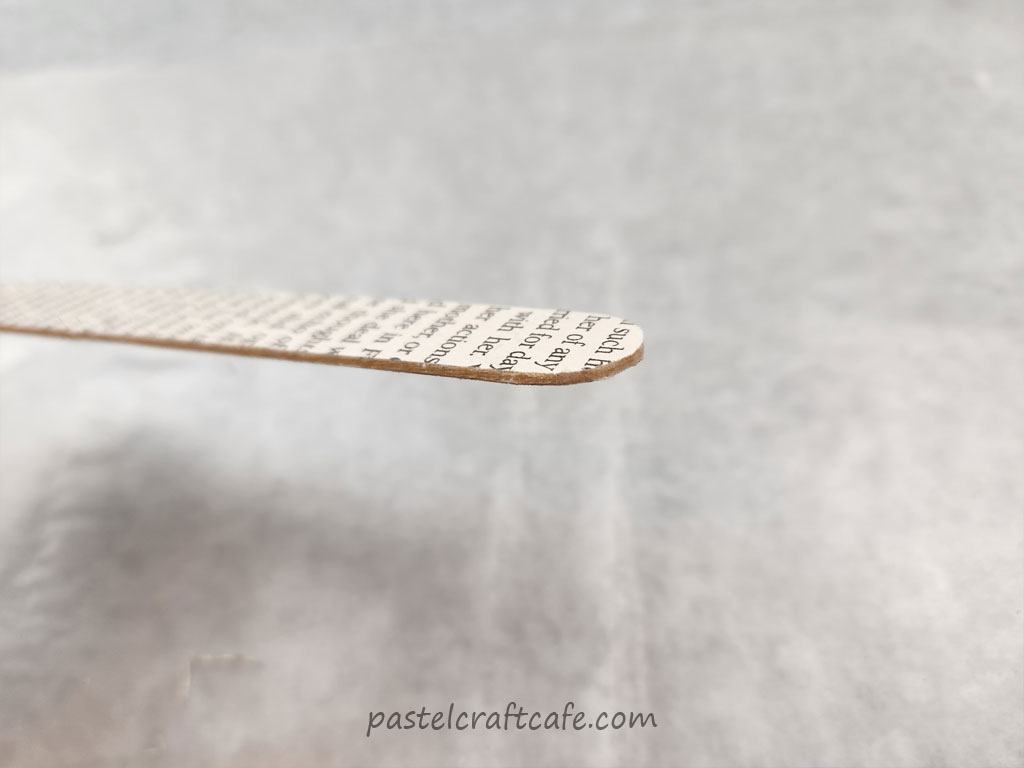
When you are done, you will probably still have a small amount of paper hanging over the edges. Here’s what mine looked like:


It’s not bad, but it could look even better. That’s where the nail file comes in.
I can’t remember where I picked up this trick, but a nail file does a wonderful job of sanding down the edges of paper on a project like this. Of course, if you have it on hand you can also use sand paper as well. But I think because this is a small project the nail file will give you better control.
File the paper down all around the edges of the stick on both sides. Hold the file at a bit of an angle so you don’t accidentally scrape off any paper on the main part of the stick. Also, file down the paper going toward the outside edge of the stick. That will also help prevent the paper from peeling.
When doing this part, the book pages are so thin that the nail file scrapes any extra bits away with ease. Scrapbook paper is a bit thicker so you need to work at it a little more to make everything nice and smooth. It takes just a bit more patience but other than that the process is the same.
Here’s what my edges looked like when I was finished:

Looks much better, right?
Step 5: Seal Bookmark
Next it’s time to add a final coat of sealer. This will prevent the edges that were just filed down from coming loose, as well as adding a protective coat to the entire bookmark.
For this I’m using Mod Podge again. However, I’m sure any type of sealer would work as long as it’s safe to use on paper.
Using a paintbrush, brush on a thin layer of the Mod Podge over one side of the popsicle stick. It doesn’t truly matter what side you start with. But I’d suggest starting with whatever side is going to be the back side.

Remember to also get some of the sealer on the edges of the stick as well. Just make sure to wipe away any excess that collects over the edges.
Once the first side has been done, set the stick aside to dry completely. Afterward, flip it and paint a thin coat on the other side as well.
As I mentioned in the beginning, I experimented with using both matte and gloss Mod Podge. For the main project I used a matte finish. I think that looks best on book pages. I also made a few more bookmarks using my scrapbook paper.

The sheet music print was also sealed with a matte finish. The other two were finished with a gloss Mod Podge. Overall I think I like the look of the matte ones more. But of course, in the end it’s going to come down to personal preference.
At this point the bookmark could be considered finished if you want. However, I like my bookmarks to have something hanging at the top.
Step 6: Punch Hole
In order to add any embellishments, we first need to punch a hole at the top of the popsicle stick. This was the part that I had the most trouble with when I first set out to make these bookmarks.
On early attempts I used a drill, but didn’t have much success. Because I was covering the hole with an eyelet, the hole needed to be sized perfectly. Unfortunately, even though my drill bit was the proper size it was still a really tight fit for the eyelet.
The other (and much worse) problem I had with drilling a hole was how often my sticks would crack. No matter how careful I was or how slowly I worked, about half of them would end up splitting. And after spending time cutting, gluing, and sanding only to have the stick break when making the hole was very discouraging to say the least.
Before completely abandoning the project, I decided to do a little research. It was hard to even find an answer for how to make a hole in a popsicle stick. And most solutions I found said to use a drill or some specialized tool that I would have no other use for.
I was about to give up, but then found the perfect solution.
Enter the Crop a Dile
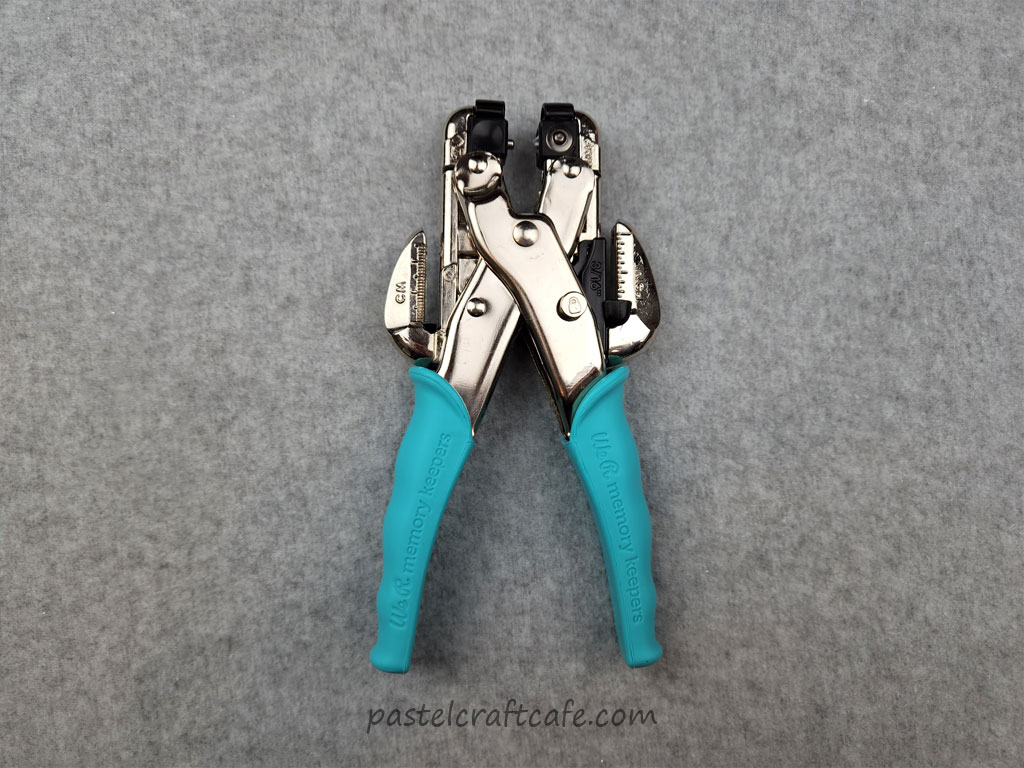
This tool is basically a supercharged hole punch. It’s mostly meant to punch a hole in multiple sheets of thick paper. But as luck would have it, it does an amazing job with popsicle sticks as well.
There are two hole sizes you can punch: 1/8 inch and 3/16 inch. Thankfully, my eyelets fit in the 3/16 hole perfectly.
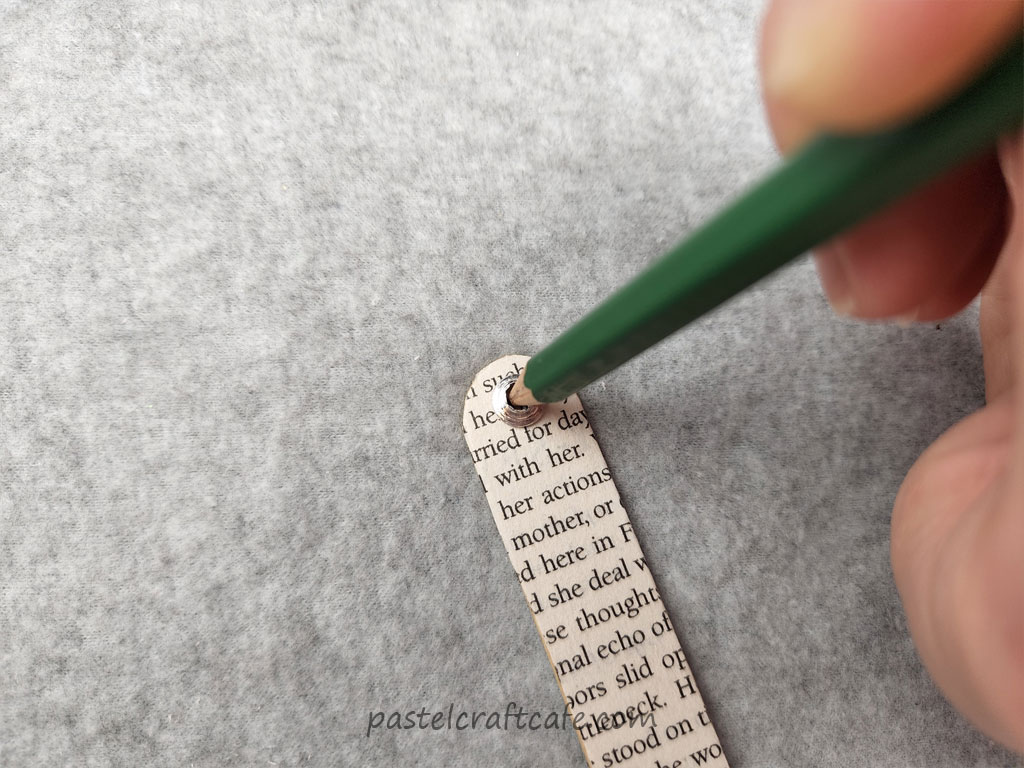
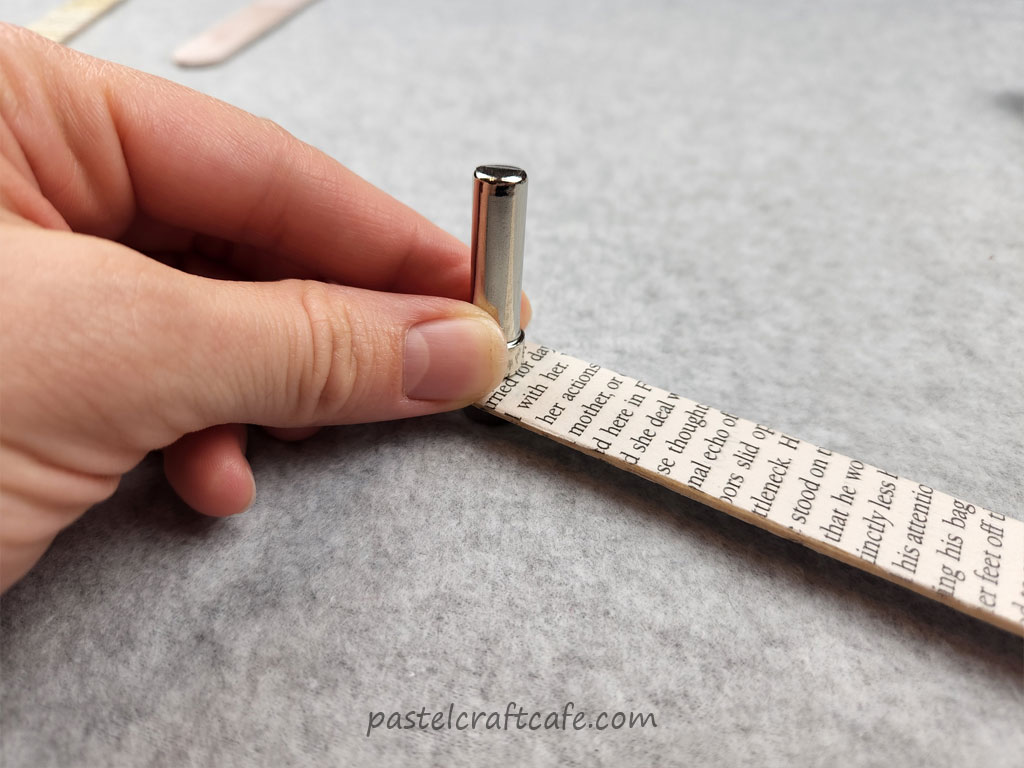
Before making the hole, I like to mark where I’m going to put it. That way you can be a bit more confident that the hole won’t end up off center.
To do this I place my eyelet where I want the hole to be. Then I use a pencil to make a small mark.
Then slide the top of the popsicle stick into the Crop a Dile. Line up the pencil mark in the middle of the hole and squeeze the handle.
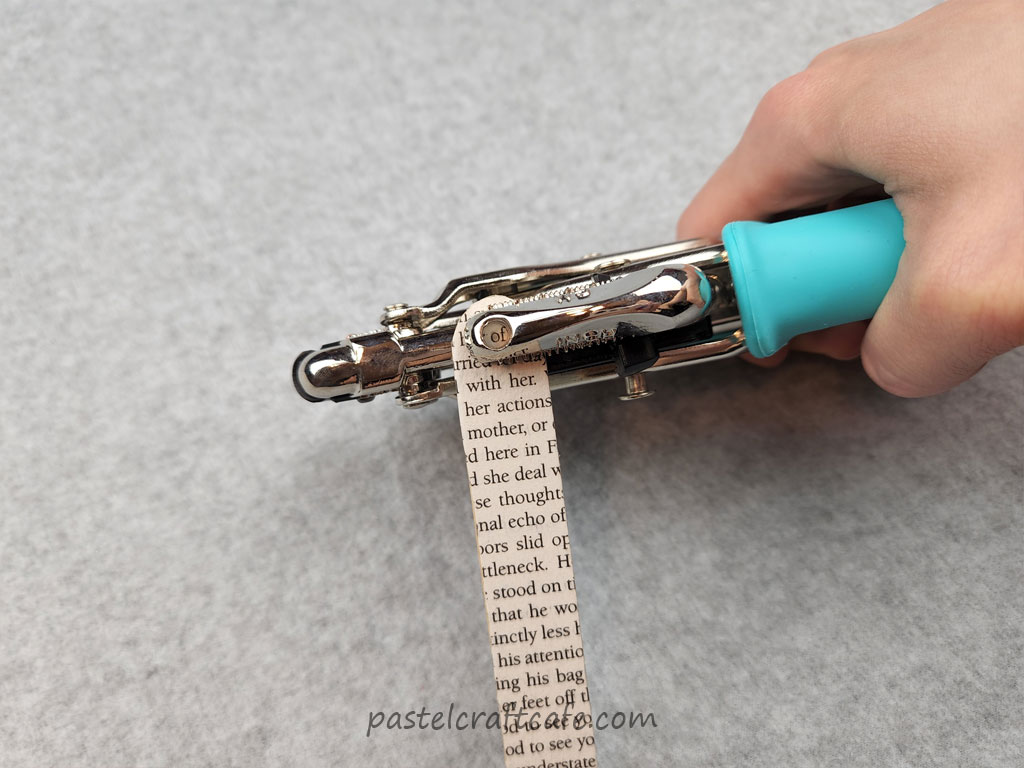
I was very surprised at how easy it was to punch through a popsicle stick with this thing. I don’t quite know how it works, but you don’t need to exert much effort at all.
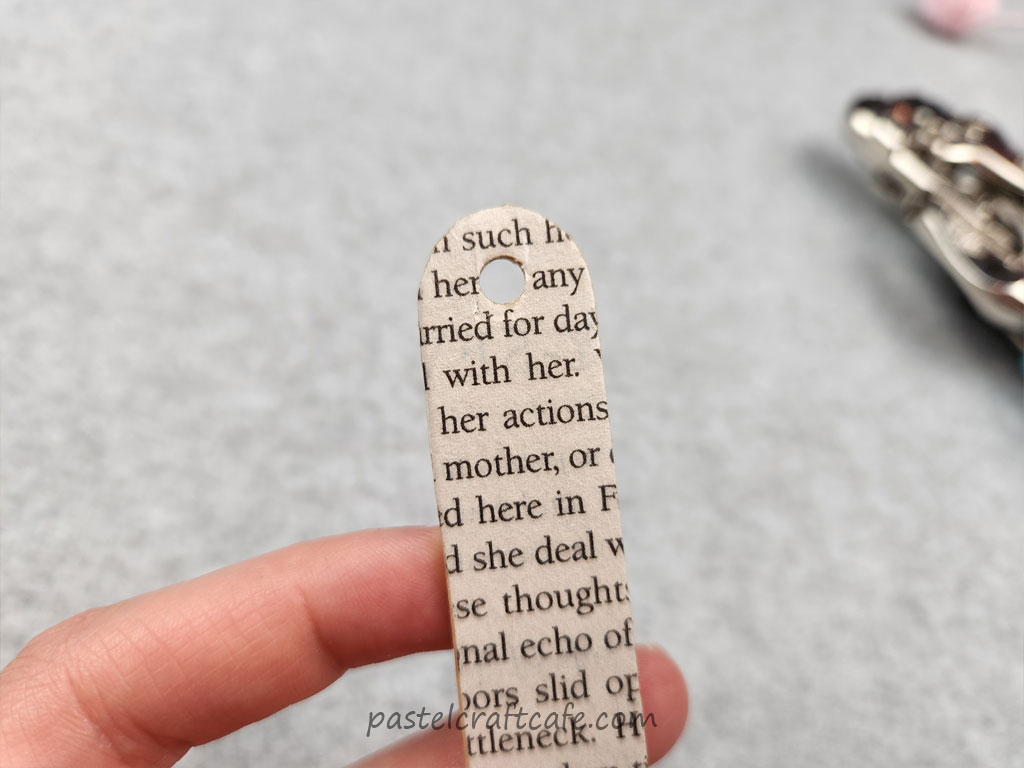
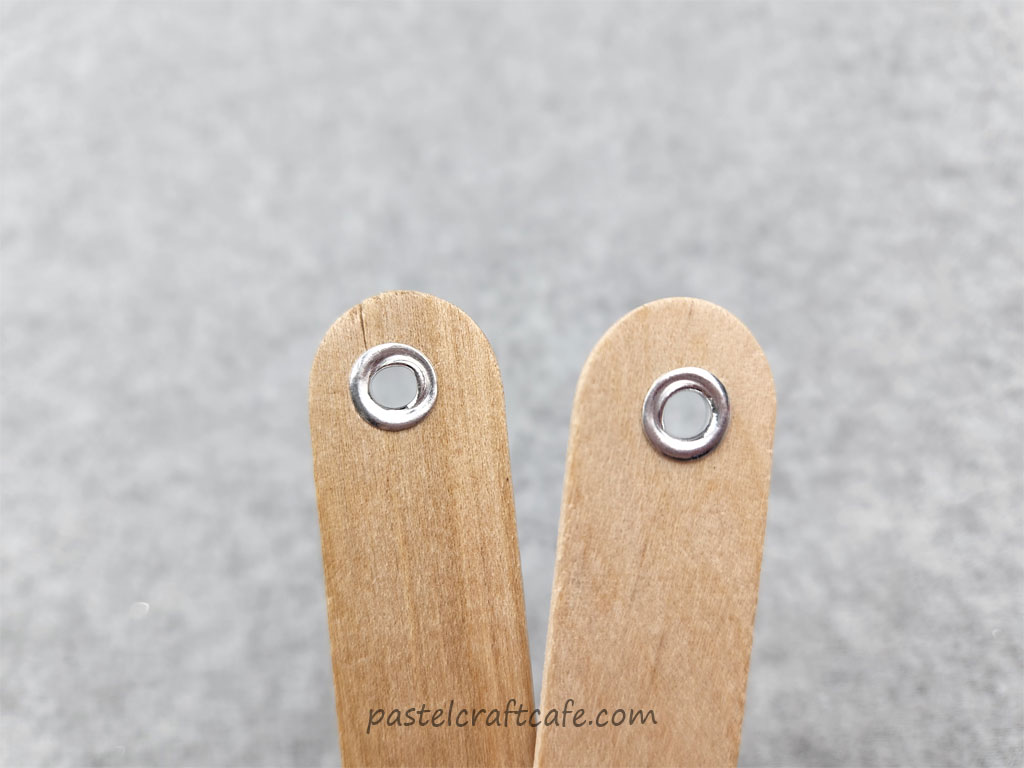
Now you’re left with a perfectly sized hole for your eyelet.
Step 7: Add Eyelet
Next, grab all your supplies to attach the eyelet. I’m going to demonstrate two different ways: using an eyelet setter and using a Crop a Dile. Both are very easy and only really differ in the tools that you need.
Using an Eyelet Setter Tool
First up is by using an eyelet setter. In addition to the eyelet, you need a 3/16” eyelet setter and a small hammer. Start by sliding your eyelet into the hole in the popsicle stick.

The wider end is going to be the front of your bookmark. Keep this in mind when you’re deciding which way to put the eyelet in.
Then line up the eyelet between the parts of the eyelet setter. My eyelet setter is made of a small piece that goes on the bottom, then the eyelet goes in thinner side down, and finally the long piece of the eyelet setter is placed on top.
Give the top of the eyelet setter a few strong taps with a hammer and it’s done. The front doesn’t look any different, but here’s the back:
You can see how on the back side the eyelet has split and flattened out. This will keep it securely in place.
Using the Crop a Dile
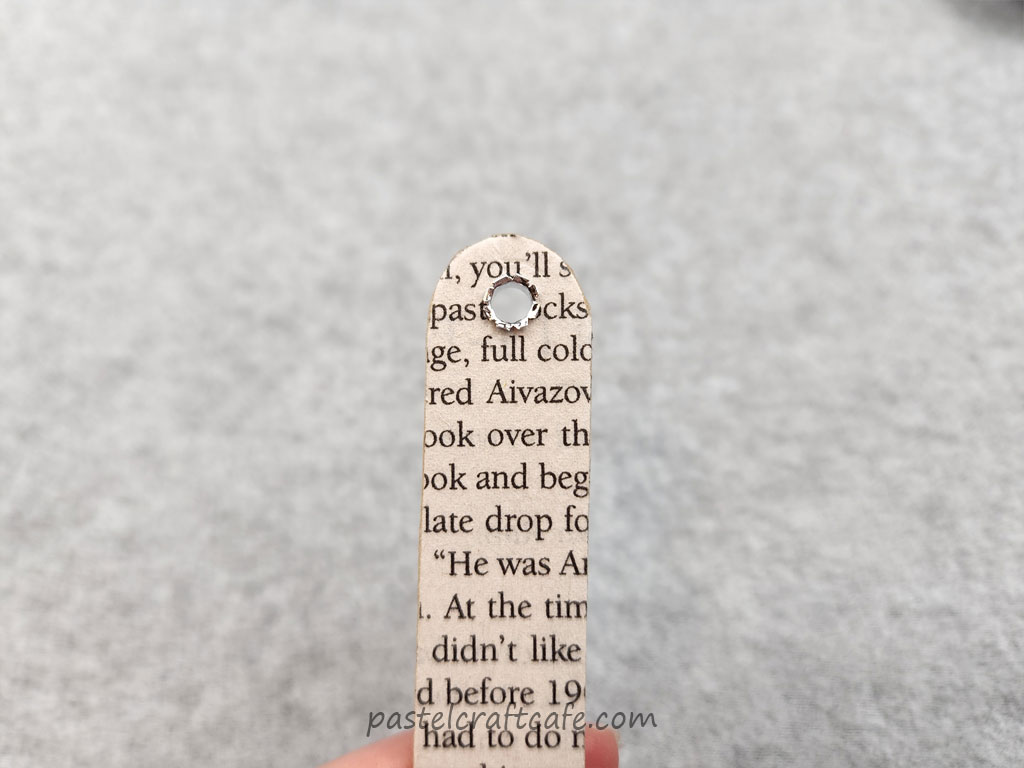
Another way you can add an eyelet is using the Crop a Dile. It has an eyelet setter built into the top.
The eyelet setter on the Crop a Dile is made from two small cubes that you can change depending on what size eyelet you are setting. For a 3/16 inch eyelet I am using side A on the top and side 1 on the bottom.
If you take a closer look, you’ll see that the bottom is labeled “BASE” and the top has a little picture of an eyelet and an arrow. This shows you what direction to place the eyelet into the setter. Nice and convenient.

Place the popsicle stick with the eyelet facing the same way as the picture and give the handle a little squeeze. And that’s it, the eyelet is set!
So Which is Better for Setting an Eyelet?
There are a few pros and cons with either method, so like with most things it will come down to personal preference.
The eyelet setter tool is by far less expensive and I bought mine in a kit that contained the eyelets as well. It also doesn’t warp the front of the eyelet front no matter how hard you hammer it.
However, it’s much harder to flatten out the back side. So it can end up feeling a bit rough.
The Crop a Dile on the other hand, is unsurprisingly much more expensive. But if you were using it to punch the hole anyway it really doesn’t matter. It also does a MUCH better job at flattening the back side of the eyelet.

It takes a bit of practice to perfectly set the eyelets, though. If you squeeze the handle too hard, the front of the eyelet gets crushed as well and warps a bit.
Here are a couple that I intentionally crushed a bit so you can see what it looks like:
It’s not super obvious, but I’m also a perfectionist. It mostly just means that you will need to practice a bit more to get your eyelets looking just right.
In the end, I think the Crop a Dile is the better option. But if possible I always like to show some other methods because not everyone will necessarily think the same.
Step 8: Add Embellishments
With the eyelet set, the only thing left to do is add some embellishments. For my book page bookmark, I added some charms onto a small length of chain. Then I attached it to the bookmark using a heavy jump ring.

With the rest I added some more charms, a tassel, and a pom pom. This gave my a nice variety of different styles.
My Final Thoughts on Paper Popsicle Stick Bookmark
Although I made four different paper popsicle stick bookmark examples, there are an endless amount of combinations that you could try. Use different papers and charms to perfectly match your style.
You could also further embellish these bookmarks by adding glitter, stickers, or stamps to the paper before painting on the sealer. Or you could draw on your own designs to make them even more personalized.
In addition to making them for yourself, they would also make such a cute little gift for friends, family, teachers, or anyone you know who could use a unique bookmark. They are also so quick to make that it’s easy to whip up a bunch of them at the same time.
The only downside I’ve found is that they are just a bit thick. So they won’t lay flat inside your book. But as far as negatives, it’s a very small one.

I hope that you enjoyed this tutorial and found it helpful. If you have any questions or comments, please feel free to leave them below. I’d love to hear from you! Thank you for stopping by and happy crafting!

If you liked this tutorial, don’t forget to pin it for later on Pinterest!
Try These Projects Next!


Your DIY Tutorial is by far the best and easily understandable one I’ve ever come across….thank you! You popsicle bookmark is a beautiful idea👍🏻
Thank you, Shyla! I’m so glad you enjoyed it!